Interactive version
This piece comes with an interactive page: diagrams, scenarios and sample sessions. The link is created fresh on every click.
Quick summary: AgentKit (formerly ClaudeKit) is a set of skills, hooks, agents, and rules you install into a project so Claude Code works through a brainstorm, plan, cook, test workflow. You install the
akCLI once, runak onboardto add the kit to your project, tuneCLAUDE.md, and start with a few commands such as/ak-brainstorm,/ak-plan, and/ak-cook. The most important habits: keep the context window lean and always give Claude a way to verify its own work.
Disclosure: I maintain AgentKit and have an affiliate relationship with it: the AgentKit link in this post is an affiliate link; buying through it gets you 30% off.
Note: the current AgentKit beta (since 3.0.0-beta.35, October 21, 2026) changed skill names from ak:<name> to ak-<name>, and the commands in this post use the new names: Claude Code calls /ak-plan, Codex calls $ak-plan. On an older version, swap ak- back to ak: to get the matching command.
This post is for people new to Claude Code, including non-programmers who are vibe coding. I explain how Claude Code works and what AgentKit adds on top, then walk through installation, the first commands, a few real-world scenarios, and the habits that keep the agent from forgetting your instructions.
What is Claude Code
Claude Code is Anthropic's coding agent. Unlike a question-and-answer chatbot, it can read files, run commands, edit code, and work through problems on its own while you watch or do something else.
How it differs from the AI tools you know
| Traditional AI | Claude Code |
|---|---|
| You write code, AI reviews | You describe the idea, AI implements |
| Copy and paste snippets | AI reads and edits files directly |
| You guide every step | AI explores, plans, and executes |
| No tool use | Full access: bash, git, file system |
The context window: your most important resource
Claude Code has a context window that holds the whole conversation: messages, files it has read, command output. The fuller the context, the worse Claude performs. This is the most important constraint to manage.
When the context fills up, you will notice:
- Claude "forgets" instructions and stops following what you said earlier.
- Claude repeats work or redoes things that are already done.
- Claude ignores
CLAUDE.mdand the rules you defined.
The fix: run /clear often between unrelated tasks.
What is AgentKit
AgentKit is a packaged set of workflows for Claude Code, made up of two kits:
- Engineer Kit: software development workflows. This post focuses on it.
- Marketing Kit: content and marketing workflows, still in progress when this post was written.
AgentKit is a paid product. I am one of its maintainers, so weigh my praise with that in mind. The reason I recommend it: it saves you from collecting and testing the endless configs and workflows scattered around the internet. Details and pricing are behind the link in the disclosure above.
The Engineer Kit (claudekit-engineer) turns Claude Code from an AI assistant into a development partner. It is not a standalone app but a .claude/ folder you drop into your project, with four parts:
| Component | Role |
|---|---|
| Skills | Commands Claude can invoke, such as /ak-cook, /ak-fix, /ak-brainstorm |
| Hooks | Scripts that run automatically when events happen |
| Agents | Subagent roles: planner, researcher, tester |
| Rules | Guidelines that persist across every session |
Philosophy: YAGNI, KISS, DRY
- YAGNI (You Aren't Gonna Need It): do not build features you do not need yet.
- KISS (Keep It Simple): pick the simplest solution.
- DRY (Don't Repeat Yourself): abstract only once you see a repeated pattern.
Installation
This section covers three steps: install the CLI, tune CLAUDE.md, and pick an explanation level that suits you.
Step 1: Install the CLI and initialize a project
Install the ak CLI first, once per machine. On macOS and Linux:
curl -fsSL https://agentkit.best/install.sh | shOn Windows (PowerShell):
irm https://agentkit.best/install.ps1 | iexThen run ak onboard and let the CLI walk you through each step. If you prefer to be explicit, the equivalent command for Claude Code is:
ak kit init engineer --target claude-code --channel stableIf you still have an old ClaudeKit install (from npm install -g claudekit-cli, the ck command), run ak migrate --from=ck to move your config to AgentKit instead of installing on top of it.
The choices below come from the installer as it was when this post was first written. The ak version may merge or rename some prompts, so check ak kit init --help on your machine:
| Choice | Options |
|---|---|
| Project status | New project: create a new folder from scratch. Existing project: drop into a repo you already have. |
| Config scope (existing projects only) | Local: this project only, in ./.claude/. Global: shared across all projects, in ~/.claude/ (Windows: %USERPROFILE%\.claude\). |
| Automation level | Interactive: the CLI asks about each option, recommended for beginners. Auto: skips prompts and auto-installs skills. |
| Release channel | Stable: stable, fewer bugs, the default. Beta: the newest features. |
| Existing install (advanced, existing projects only) | Keep existing: merge through prompts, safe. Fresh reset: delete the kit's files in .claude/ and replace them. |
If a .claude/ folder already exists, back it up or merge files by hand before installing the kit into the project.
After installing, your project looks roughly like this (a few file names may differ between versions):
project/
├── CLAUDE.md               # template, customize later
├── AGENTS.md               # agent definitions
├── .gitignore
├── .repomixignore          # Repomix ignore patterns
├── release-manifest.json   # kit version manifest
├── plans/                  # plans directory
├── .opencode/              # OpenCode compatibility
└── .claude/                # kit config
    ├── .ck.json            # kit metadata
    ├── settings.json       # Claude Code settings
    ├── metadata.json       # deletion patterns
    ├── statusline.cjs      # statusline config
    ├── .env.example        # environment template
    ├── .mcp.json.example   # MCP config template
    ├── agents/             # subagent definitions
    ├── hooks/              # event-driven scripts
    ├── rules/              # workflow rules
    ├── skills/             # the /ak-... commands
    ├── scripts/            # utility scripts
    ├── schemas/            # JSON schemas
    ├── output-styles/      # response formats
    └── session-state/      # session tracking
On Windows the layout is identical; only the path separator is \.
Step 2: Customize CLAUDE.md
The installer creates a CLAUDE.md template if your project does not have one yet. You can then tailor it to your project in one of three ways:
- Edit the template directly, adding build commands, code style, and conventions.
- Run
/initin Claude Code to regenerate it from the codebase. IfCLAUDE.mdalready exists,/initonly suggests improvements and does not overwrite. - Ask an LLM (large language model) to write it following the 200-line rule.
A sample CLAUDE.md:
# Project Name

## Build Commands
- `npm install`: install dependencies
- `npm run dev`: start dev server
- `npm test`: run tests

## Code Style
- Use ES modules (import/export)
- Prefer async/await over callbacks
- TypeScript strict mode
Keep it under 200 lines, as Anthropic recommends. Long files waste context and make Claude more likely to miss rules, meaning adherence to your instructions drops. Only include what matters: build commands, coding standards, key conventions. If the instructions grow, move parts out with @import or into files under .claude/rules/.
Step 3: Set the explanation level (optional)
In a Claude Code session, run /ak-coding-level with no arguments to open a level picker, or set a level directly:
# Open the level picker (0 to 5)
/ak-coding-level

# Or set a specific level, for example Junior mode
/ak-coding-level 1| Level | Name | Style |
|---|---|---|
| 0 | ELI5 | Explains as if to someone who has never coded |
| 1 | Junior | Explains why, mentor style |
| 2 | Mid-level | Design patterns, systems thinking |
| 3 | Senior | Trade-offs, architecture decisions |
| 4 | Tech Lead | Risk and business impact |
| 5 | God Mode | Zero hand-holding (default, for 15+ years of experience) |
God Mode, the default, assumes you are an expert: you already know the answer and only need validation, a second opinion, or fast typing. Claude acts as a force multiplier, not a teacher.
| In God Mode, Claude will | In God Mode, Claude will not |
|---|---|
| Default to code, minimal prose | Explain concepts, patterns, or syntax |
| Produce production-ready code right away | Open with Here's how... or Let me explain... |
| Use advanced patterns without explanation | Add code comments unless asked |
| Challenge the approach if it sees a serious flaw | Add "Key Takeaways", summaries, or next steps |
| Flag only critical issues (security, data loss) | Ask clarifying questions for minor ambiguity |
| Stay terse, every word earning its place | Treat you as someone who needs hand-holding |
If you are new to Claude Code, set level 1 or 2 to get explanations. God Mode optimizes for speed but assumes you can debug on your own when Claude gets it wrong.
Claude Code also has its own Output styles feature: run /config, choose "Output style", and pick from the menu. It is an independent Claude Code feature that happens to share a few names with the kit's levels. The two mechanisms differ:
/ak-coding-levelwrites to.ck.json, and the guidelines are injected through theSessionStarthook each time a session opens.- Output styles change the system prompt directly, store
outputStylein.claude/settings.local.json, and take effect from the next session to keep the prompt cache stable.
Use one or the other, not both at once, so the guidelines do not overlap.
Custom rules in .claude/rules/
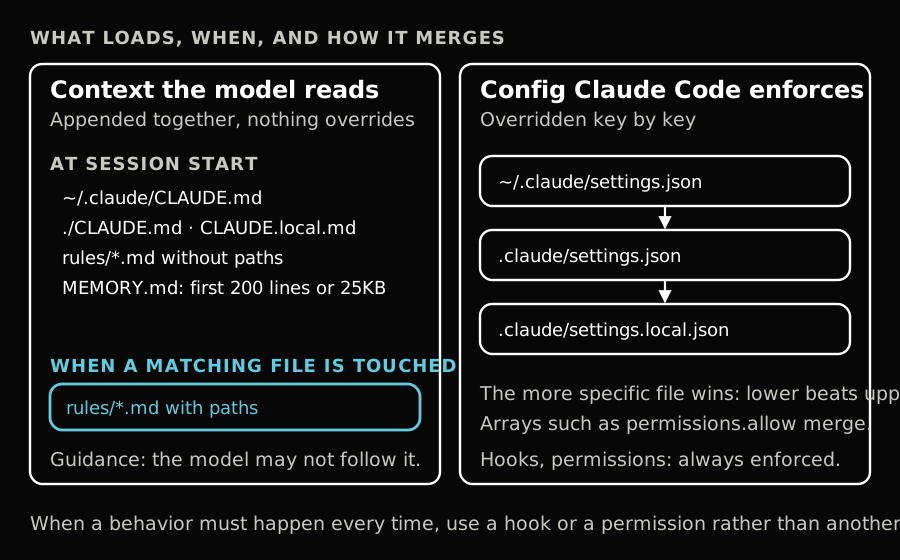
This section is about Claude Code itself and applies even if you do not use AgentKit. In large projects, split instructions into small files under .claude/rules/ instead of cramming everything into one CLAUDE.md. Rules can be scoped by file path through YAML frontmatter, loading into context only when Claude touches matching files, which saves space.
The .claude/ folder layout
Rules are only one part; .claude/ holds several kinds of config. There are two scopes: project (committed to git, shared with the team) and global (your machine only, never committed).
Project scope:
./CLAUDE.md              # project instructions (or ./.claude/CLAUDE.md)
./CLAUDE.local.md        # personal, gitignored
./.mcp.json              # MCP servers (team-shared)
./.worktreeinclude       # copy gitignored files into new worktrees (optional)
./.claude/
├── settings.json        # permissions, hooks, model
├── settings.local.json  # personal, auto-gitignored
├── rules/*.md           # topic rules (path-scopable)
├── skills/<name>/       # /skill-name + bundles
├── commands/*.md        # /command (legacy, prefer skills)
├── agents/*.md          # subagents
├── agent-memory/        # project subagent memory (memory: project)
└── output-styles/*.md   # system-prompt styles
Global scope:
~/.claude.json           # app state, personal MCP, UI prefs
~/.claude/
├── CLAUDE.md            # global instructions
├── settings.json        # default settings
├── keybindings.json     # custom shortcuts
├── rules/*.md           # user-level rules
├── skills/              # personal skills
├── commands/            # personal commands
├── agents/              # personal subagents
├── agent-memory/        # subagent memory (memory: user)
├── output-styles/       # personal styles
├── plugins/             # installed plugins (auto-managed)
└── projects/<project>/memory/   # auto-memory (written by Claude)
On Windows the paths are the same but use \. The global folder lives at %USERPROFILE%\.claude\, with the file %USERPROFILE%\.claude.json.
Scoping rules by path
Add YAML frontmatter with a paths field at the top of a rule file to limit where it applies. Claude only loads the rule while working with files that match the glob pattern, so the context does not bloat and you still keep specialized guidance per domain (auth, database, UI, tests).
---
paths:
  - "src/api/**/*.ts"
  - "src/server/**/*.ts"
---

# API Development Rules
- All endpoints must validate input via Zod
- Use standard error response format
- Include OpenAPI docs comments
Rules without a paths field load unconditionally at the start of a session. With paths, they only activate when Claude reads matching files.
Rules are guidance, not enforcement
Rules (and CLAUDE.md) are instructions Claude reads, not config that Claude Code enforces. Claude may not follow them if they are contradictory or vague. For guaranteed behavior, use:
- Hooks (in
settings.json): scripts that run before or after tool calls. - Permissions: allow or deny specific tools and commands.
CLAUDE.md and settings merge differently
CLAUDE.md and rules | settings.json |
|---|---|
| Concatenated into context: global, project, and local are all read | Key-level override: project overrides global, local overrides project |
| On conflict: no file reliably wins, the model reads both; edit them so only one instruction remains | Arrays (permissions.allow) combine; scalars (model) take the most specific value |
Two related points:
- Commands and skills are now one mechanism. New workflows should use
skills/<name>/SKILL.md, bundling supporting files (checklists, scripts, reference docs). If a skill and a command share a name, the skill wins. - Auto-memory. Claude writes notes to
~/.claude/projects/<project>/memory/MEMORY.mdon its own. According to Anthropic's docs at the time of writing, each session loads only the first 200 lines or 25KB of that file; topic files load on demand. Toggle it with/memoryor theautoMemoryEnabledsetting.
How CLAUDE.md differs from .claude/rules/
CLAUDE.md | .claude/rules/*.md |
|---|---|
| General instructions for the whole project | Modular instructions by topic or path |
| Always loaded at launch | Without paths: loaded at launch. With paths: loaded when matching files are touched |
| Target: under 200 lines | One topic per file (code-style.md, testing.md) |
| Build commands, high-level conventions | Domain rules: API, frontend, security, database |
| A single file | Many files, subdirectories scanned recursively |
When a session opens, Claude reads the memory files and concatenates them into context rather than letting them overwrite each other. When CLAUDE.md approaches 200 lines, split it into .claude/rules/ by topic (for example api-design.md, testing.md, security.md). Use descriptive file names so both the team and Claude can find them quickly with Grep.
Do and don't when writing rules
Do:
- Split rules by domain or concern (
i18n-rules.md,testing-rules.md). - Write concisely, with bullets or checklists Claude can parse quickly.
- Use kebab-case, descriptive names (
api-error-handling.md). - Include good and bad examples.
- Reference exact paths when a rule applies to a specific folder.
Don't:
- Write rules as long as documentation.
- Duplicate content between
CLAUDE.mdandrules/. - Create rules for one-off things (YAGNI).
Five sample rule files
Multilingual app (i18n)
# i18n Rules

## Scope
Apply to all user-facing text in src/components/ and src/pages/.

## Rules
- Every user-visible string MUST use `t('key')` from `useTranslation()`
- Translation keys live in `src/i18n/{locale}/{namespace}.json`
- Supported locales: vi (default), en, zh, ja
- Key naming: `section.component.element`
- Do NOT translate: code snippets, entity IDs, technical identifiers

## When adding new text
1. Add the key to `src/i18n/vi/{ns}.json` first
2. Copy the key to the other 3 locales with a placeholder
3. Update `src/i18n/index.ts` if you create a new namespace
API error handling
Enforce a discriminated union pattern for API responses, in api-error-handling.md:
# API Error Handling

## Pattern
Every API call must be wrapped in try/catch and return a discriminated union:
{ok: true, data} | {ok: false, error}

## Error Types (src/types/errors.ts)
- NetworkError, ValidationError, AuthError, ServerError

## UI Display
- Toast for transient errors (NetworkError)
- Inline form errors for ValidationError
- Redirect to /login for AuthError
Safe database migrations
Avoid breaking changes when migrating the database, in db-migration.md:
# Database Migration Rules
- NEVER drop columns in a migration: mark deprecated first, drop in a later release
- Every migration must have `up()` AND `down()`, rollback-safe
- Index concurrently (Postgres: `CONCURRENTLY`) for tables > 10k rows
- Test migrations on a copy of prod data before merging
Testing standards
Coverage targets and test conventions, in testing-rules.md:
# Testing Rules

## Coverage
- Unit tests for business logic: > 80%
- Integration tests for API endpoints
- E2E tests for critical user flows (login, checkout)

## Conventions
- Test files: `*.test.ts` next to the source file
- Arrange/Act/Assert pattern
- Use factories instead of hardcoded fixtures
- Mock external services, do NOT mock internal modules
Security baseline
Baseline security rules for every project, in security-rules.md. CORS (Cross-Origin Resource Sharing) is the browser mechanism that decides which websites may call your API:
# Security Rules
- NEVER log secrets, tokens, passwords
- Input validation: Zod schema at API boundary
- SQL: prepared statements only, no string concat
- Auth middleware check on every protected route
- CORS whitelist from env, no wildcard
- Dependencies: audit weekly with `npm audit`
Advanced loading mechanisms
When a project grows or you want to share rules across repos, Claude Code offers four ways to extend context.
| Mechanism | Use it when | How to turn it on |
|---|---|---|
@import | You want long content in its own file while CLAUDE.md stays short | Write @path/to/file.md in CLAUDE.md, nested up to 5 levels |
--add-dir | You work in a monorepo or need folders outside the project, such as ../shared | The --add-dir flag, the /add-dir command, or additionalDirectories in settings.json |
CLAUDE.local.md | You keep personal notes that should not be committed, such as sandbox URLs or test accounts | Create it next to CLAUDE.md and add it to .gitignore |
| Symlink | You share one rule set across several projects | ln -s a rule folder or file into .claude/rules/ |
@import: embed another file in CLAUDE.md
In CLAUDE.md, write @docs/coding-standards.md or @~/.claude/my-prefs.md to embed that file's content right where you put it. Both relative and absolute paths work. According to Anthropic's docs at the time of writing, nesting goes at most 5 levels deep. Use it to move long content into separate files while keeping CLAUDE.md lean.
@docs/coding-standards.md
@~/.claude/rules/security.md
@.claude/rules/testing.md--add-dir: add working directories to the same session
By default Claude Code only reads files in the directory you launched it from. The --add-dir flag lets you add more directories to the same session, which helps with monorepos or when you need to reference ../shared or ../design-system outside the current project. Three equivalent ways: the --add-dir flag at launch, the /add-dir command inside a session, or additionalDirectories in settings.json.
# Flag at launch
claude --add-dir ../shared --add-dir ../design-system

# Or the command inside a session
/add-dir ../shared
Note: by default Claude does not load CLAUDE.md or CLAUDE.local.md from directories added with --add-dir, to stay backward compatible with older projects. To have Claude apply memory from those directories, set this environment variable before launching:
export CLAUDE_CODE_ADDITIONAL_DIRECTORIES_CLAUDE_MD=1
claude --add-dir ../shared
Once enabled, every CLAUDE.md or CLAUDE.local.md in the added directories loads alongside the main project, so Claude understands each workspace's conventions in a single session. According to Anthropic's docs, the feature has existed since Claude Code 2.1.20 and is opt-in for backward compatibility.
CLAUDE.local.md: personal notes, never committed
This file holds your own preferences for the project: sandbox URLs, test accounts, personal debug commands. Add CLAUDE.local.md to .gitignore so it stays out of commits. Claude loads it together with CLAUDE.md, but it exists only on your machine; the rest of the team does not see it.
Symlinks: share one rule set across projects
.claude/rules/ supports symlinks. Keep your team's standard rules in one place and link them into each project; when you update a rule, every project picks it up at once. Claude detects circular symlinks and skips them instead of getting stuck.
ln -s ~/shared-claude-rules .claude/rules/shared
ln -s ~/company-standards/security.md .claude/rules/security.md
Seven core commands for beginners
These seven commands are enough for your first week. Each comes with a sample prompt you can copy and try.
/ak-brainstorm
Explore options before you commit. Output: trade-off analysis, pros and cons, a recommendation.
/ak-brainstorm How should we implement real-time notifications? WebSockets vs SSE vs polling?/ak-plan
Detailed planning for complex features: research, plan, list of files, success criteria.
/ak-plan Implement user authentication with OAuth2 (Google, GitHub)/ak-cook
The main implementation command, an eight-step workflow: research, review, plan, review, implement, review, test, finalize.
/ak-cook Add a logout button to the navbarTwo common flags: --fast skips research, --auto skips all review gates.
/ak-fix
A seven-step process (numbered 0 to 6): mode selection, scout, diagnose, complexity, fix, verify, finalize.
/ak-fix Users can't login after session timeout - seeing "Invalid token" error/ak-ask
Ask technical questions, like having a senior engineer by your side.
/ak-ask How does our authentication middleware handle token refresh?/ak-test
Run tests, with support for multiple test runners.
/ak-test src/auth/ # test a specific folder/ak-watzup
Review the changes in a session: modified files, git diff analysis, impact assessment.
/ak-watzupReal-world scenarios
These five scenarios combine the commands above into complete workflows, from beginner-friendly tasks to ones that need more codebase knowledge.
Build a new feature (beginner)
Add a user settings page with a dark mode toggle and notification preferences:
/ak-brainstorm User settings page: dark mode + notifications. Should we store in localStorage or backend? Component structure?
# → Output: plans/reports/brainstorm-260414-user-settings.md

/ak-plan Implement per brainstorm report at plans/reports/brainstorm-260414-user-settings.md
# → Creates implementation plan with phases

/ak-cook plans/260414-xxxx-user-settings/plan.md
# Execute: implement → review → test → done

/ak-git cm
# Commit with message
Result: a feature built from a proper plan, with reviewed code, tests, and a commit.
Fix a bug quickly (beginner)
The signup form does not show an error message when the email is invalid:
/ak-fix Email validation in signup form doesn't show error message.
File: src/components/SignupForm.tsx
Expected: "Invalid email" appears below input
Actual: No message, just red border

/ak-test src/components/SignupForm.test.tsx
Result: the bug is fixed with a regression test. The automated pipeline: scout, diagnose, fix, test, verify.
Onboard onto a new codebase (intermediate)
You just joined a new team and need to understand the codebase before contributing:
/ak-scout src/
# Explore structure

/ak-ask How does the authentication flow work?
/ak-ask Explain src/services/auth/token-handler.ts
/ak-ask What patterns does this codebase follow?
Result: you grasp the architecture and main flows much faster than by reading the docs yourself.
Refactor safely (intermediate)
A legacy module of about 500 lines needs cleanup, but you are afraid of breaking what works:
/ak-ask Analyze src/legacy/user-manager.js
What are the hidden dependencies? Side effects?

/ak-plan Refactor user-manager.js into smaller modules.
Must maintain all existing behavior. Write tests first.
# → Creates implementation plan with phases

/ak-cook <plan-path>
# Execute: implement → review → test → done

/ak-code-review
# Verify no regressions
Result: modular code with tests that preserves existing behavior, so you can refactor with more confidence. For a stricter planning step, see when to turn on --deep and --tdd for /ak-plan.
Build UI from Figma (intermediate)
The product manager sends a Figma mockup, and you need UI that closely matches the design, with animations:
/ak-frontend-design [paste Figma URL or screenshot]
# Auto-activates /ak-ui-ux-pro-max (design intelligence)
# Claude generates with correct spacing, colors, animations

/ak-ui-styling Add dark mode support for the component just created
/ak-test src/components/NewFeature.test.tsx
Result: UI that closely follows the design, responsive, with dark mode. You should still have a designer review it before release.
Habits worth building
These four habits help Claude get it right the first time and cut down on rounds of corrections.
Give Claude a way to verify its work
This is the most useful tip in this post. Compare two ways of asking:
# Weak
implement email validation

# Strong
write validateEmail function. Test cases: user@example.com → true
Run tests after implementing.
Go brainstorm, plan, cook
/ak-brainstorm [explore options]
/ak-plan [detail implementation]
/ak-cook [implement + test]
/ak-git cm [commit]
/ak-cook already includes testing. Use /ak-test [path] separately only when you need to test a specific folder.
Go straight to /ak-plan and skip brainstorming when:
- You already know the approach (fixing a specific bug, adding an endpoint per spec).
- The task is simple and needs no exploration of alternatives.
- You already have a design or spec from Figma or a product requirements document (PRD).
Run /ak-brainstorm first when you do not know the best approach, need a trade-off analysis (for example WebSockets vs SSE), or are building something without precedent.
For UI-heavy features, add a mockup step to review first:
/ak-brainstorm → /ak-plan → /ak-frontend-design (mockup) → Review → /ak-cookAn HTML mockup with mock data is faster than a real implementation, catches design issues early, and avoids rework.
Provide specific context
# Weak
add tests for auth

# Strong
write tests for src/auth/token-refresh.ts:
- successful refresh with valid token
- failure when token expired > 7 days
- concurrent refresh requests
Clear the context often
Run /clear when:
- You switch to a completely different task.
- Claude has been wrong more than twice on the same problem.
- Claude starts "forgetting" instructions.
Habits to avoid
| Habit | What happens | Fix |
|---|---|---|
| Kitchen-sink session | Many unrelated tasks in one session, for example Fix login, then Add dark mode, then Optimize images, then back to login. The context fills with noise and Claude gets confused. | Run /clear between unrelated tasks |
| Correcting the same issue over and over | Claude is wrong, you correct it, it is still wrong, you correct again. The context fills with failed approaches. | After 2 failed corrections, run /clear and write a better prompt |
| Skipping planning for "simple" tasks | "This is simple, no need to plan," and three hours later you are still debugging edge cases. | Use /ak-plan --fast for lightweight planning |
| Trusting without verifying | Claude says Done!, you ship to production, and everything breaks. | Run /ak-test, test by hand, review the code, then ship |
| Overly vague prompts | make it better, fix the bug, add auth do not give Claude enough context to get it right. | State the symptom, the location, and the expected behavior |
Common workflow patterns
These four patterns are ordered by task size, followed by a suggested order for learning the commands.
Quick fix (under 5 minutes)
/ak-cook --fast Fix typo
/ak-git cm "fix: typo"
Standard feature
/ak-brainstorm
/ak-plan → /ak-cook
/ak-git cm
Complex, multi-day work
Day 1:  /ak-brainstorm → /ak-plan
Day 2+: /ak-cook [Phase N]
        /clear between phases
Bug investigation
/ak-debug [symptom + logs]
# Analyze root cause → fix manually or with /ak-fix
Learning the commands in stages
- Week 1 (beginner):
/ak-brainstorm,/ak-plan,/ak-cook,/ak-fix,/ak-ask,/ak-test,/ak-git. - Weeks 2 to 4 (intermediate):
/ak-scout,/ak-code-review,/ak-debug,/ak-ship,/ak-watzup,/ak-frontend-design,/ak-ui-styling. - Month 2 onward (advanced):
/ak-team,/ak-autoresearch,/ak-predict,/ak-security,/ak-loop,/ak-scenario,/ak-xia,/ak-bootstrap. There are many more skills beyond these.
Cheat sheet
| Situation | Command |
|---|---|
| Explore options | /ak-brainstorm [question] |
| Plan a feature | /ak-plan [description] |
| Implement a feature | /ak-cook [description] |
| Quick small fix | /ak-cook --fast [fix] |
| Fix a bug | /ak-fix [symptom] |
| Technical question | /ak-ask [question] |
| Run tests | /ak-test [path] |
| Explore the codebase | /ak-scout [path] |
| Code review | /ak-code-review [path|--pr N] |
| Review changes | /ak-watzup |
| Commit | /ak-git cm "message" |
| Full ship pipeline | /ak-ship |
| Clear context | /clear |
| Beginner mode | /ak-coding-level 1 |
This table only covers commonly used commands. Detailed syntax and examples for every command are at vividkit.dev/guides/commands.
Commands in this post use the /ak-<name> skill names of the current AgentKit beta (since 3.0.0-beta.35). If you still run an older AgentKit with /ak: commands, or an older ClaudeKit install with /ck: commands, the names map one to one; check the command list of the version you have installed.
Where to go next
Once you are comfortable with /ak-brainstorm, /ak-plan, /ak-cook, and /ak-test, read when to turn on --deep and --tdd for /ak-plan for large refactors. After that, the ak-preview guide shows how to turn plans and architecture into diagrams. If you want to try it, details are at AgentKit (affiliate link).
Use this piece in your agent
Get an API keyCopy the text below and paste it into Claude Code, Codex or whichever agent you use. The agent reads the piece and checks it against the repo you have open.
Read "Getting started with AgentKit for Claude Code: setup and first commands" on modernEngineer and apply it to this repo.
1. Call the content_get tool of the modernengineer MCP server with locale "en", slug "claudekit-beginners-guide". If MCP is not connected or access is refused, read the page https://modernengineer.dev/en/library/claudekit-beginners-guide instead.
2. Summarize the main steps of the piece and point out which apply to this repo.
3. Propose concrete changes and ask me before editing any file.
Connect MCP in Claude Code (once)
claude mcp add --transport http modernengineer \
  https://api.modernengineer.dev/mcp \
--header "Authorization: Bearer <API key>"This piece is open to everyone: without MCP, the agent can still read it straight from the link.
- Version
- v1.0.0
- Updated
- 18/04/2026
- Licence
- All rights reserved
- Slug
- claudekit-beginners-guide