Quick summary: you need a VPS to run Docker, a domain in Cloudflare to act as the OAuth sign-in gate, and a ChatGPT plan that supports MCP (Model Context Protocol). The order is: deploy to the VPS, put the hostname behind Cloudflare Access, enable Managed OAuth, switch the origin to
cloudflare-accessmode, then create the connector in ChatGPT. You only need a GitHub App when cloning private repos.
Disclosure: I maintain AgentKit and have an affiliate relationship with it: the AgentKit link in this post is an affiliate link; buying through it gets you 30% off. Cloud Harness MCP is written by Duy Nguyen (@mrgoonie). The source lives in the bestagentkits/cloud-harness-mcp repo under the AgentKit organization on GitHub, and the docs at docs.harness.agentkit.best. I am not the author of Cloud Harness; this series is how I set it up myself from that repo.
The images are real screenshots from a running instance. Screenshots and menu paths reflect the ChatGPT, Cloudflare, and GitHub interfaces as of September 16, 2026; these change often, so if a button is not where the guide says, search by the section name. Every identifying value is blurred: hostname, root domain, VPS IP, email, AUD, team domain, user name, GitHub App name and ID, repo name. Each blurred region maps to a placeholder in the table at the end of section 2. On October 29, 2026 I rechecked the steps against the repo at v0.79.1; the repo changes almost daily, so where they disagree, the repo's docs/ wins.
This is part 1 of a three-part series. It covers what Cloud Harness MCP is, the prerequisites and the end-to-end order. Part 2 walks the deploy and ChatGPT connector steps, and Part 3 gives a prompt for handing the VPS work to an AI agent. Part 1 is free to read; Parts 2 and 3 are for Subscribers.
1. Introduction
What Cloud Harness MCP is, why it needs exactly this VPS + Cloudflare pairing, and what you can do once it is set up.
What Cloud Harness MCP is
Cloud Harness MCP is a private, single-owner coding harness that runs on your own server and is exposed over authenticated MCP using Streamable HTTP (HyperText Transfer Protocol). Instead of letting an agent run commands on your machine, it opens a temporary workspace on the VPS: clones the repo into a sandbox, runs commands in a non-root Docker executor, cleans up on a TTL, then returns results to the AI client.
The agent runs on a separate Linux machine that Harness provisions, not on yours. The repo and Docker both live inside a container on that machine; when the TTL expires, Harness removes the container and workspace files, while the VPS itself stays.
Architecture
The architecture separates authentication authority from Docker authority. Everything in the later sections follows from this diagram.
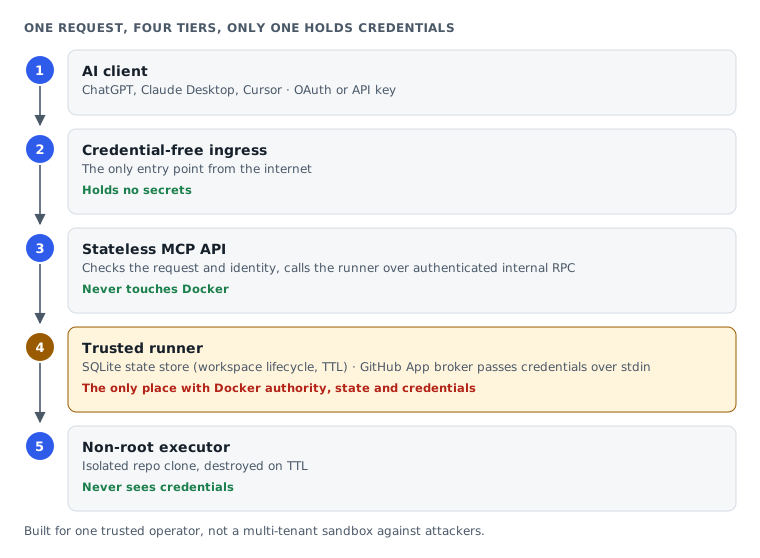
| Component | Why it cannot be substituted |
|---|---|
| VPS | Docker authority, the runner and the state all live here. Cloudflare and ChatGPT do not run containers |
| Cloudflare Access | ChatGPT has nowhere to attach Authorization: Bearer, so an OAuth/JWT layer at the edge is mandatory |
| GitHub App | The executor never sees a GitHub token; the broker passes credentials over stdin. Private repos require the App |
| Your own domain | Managed OAuth needs a hostname inside a Cloudflare zone you control |
This model is designed for one trusted operator, not as a multi-tenant sandbox hardened against attackers.
Two connection lanes
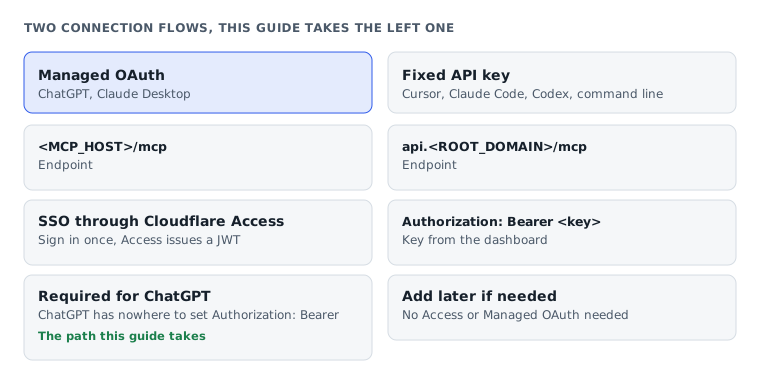
| Lane | Endpoint | Auth | Used by |
|---|---|---|---|
| Managed OAuth | <MCP_HOST>/mcp | SSO (Single Sign-On) via Cloudflare Access | ChatGPT, Claude Desktop |
| Static API (Application Programming Interface) key | api.<ROOT_DOMAIN>/mcp | Authorization: Bearer <dashboard-api-key> | Cursor, Claude Code, Codex, CLI |
This guide takes the Managed OAuth lane, because ChatGPT only supports OAuth. Add the API key lane later if you need it.
What you can do once it is set up
On ChatGPT Web you only do three things:
- Open a new 1-on-1 chat. Not a Custom GPT, Project chat, Canvas or the mobile app.
- Pick the CloudHarness connector from the tools menu, or type
@CloudHarness. - Describe the work along with the repo URL, for example: "clone
https://github.com/<OWNER>/<REPO>.git, runnpm test, then commit the fix".
As you chat, the agent walks the four steps below and calls the matching tools:
| Step in the session | Tool the agent calls |
|---|---|
| Open a workspace and clone the repo | workspace_open |
| Read and edit code | files_list, files_read, grep_search, files_write |
| Run commands and tests | exec_run |
| Commit, then close the workspace | git_status, git_commit, git_push, workspace_close |
When you are done, tell the agent to close the workspace. Forgetting is fine. The workspace self-destructs when the idle TTL or the wall TTL runs out. The defaults are 5 minutes and 15 minutes (still true at v0.79.1). You can change them in the dashboard's Settings, which applies to workspaces opened afterwards, or through WORKSPACE_IDLE_TTL_SECONDS and WORKSPACE_WALL_TTL_SECONDS on the environment variables page.
Full tool set: Tools Reference.
If you do not have your own domain
This guide assumes you have a hostname inside a Cloudflare zone you manage. Without one you can only get halfway:
| Lane | Result | Why |
|---|---|---|
owner-bearer, for Cursor, Claude Code, Codex, CLI | Works | The repo defaults to cloud-harness-mcp.<ip>.sslip.io; Let's Encrypt can issue a cert because sslip.io resolves to the IP embedded in the name. The trade-off: the dashboard is disabled in this mode |
cloudflare-access, for ChatGPT Web | Does not work | An Access self-hosted app must attach to a hostname in your Cloudflare zone, and needs a Zero Trust org matching that zone. docs/deployment.md is explicit: "requires a hostname in an owner-controlled Cloudflare-managed zone… the current sslip.io hostname may not satisfy that prerequisite" |
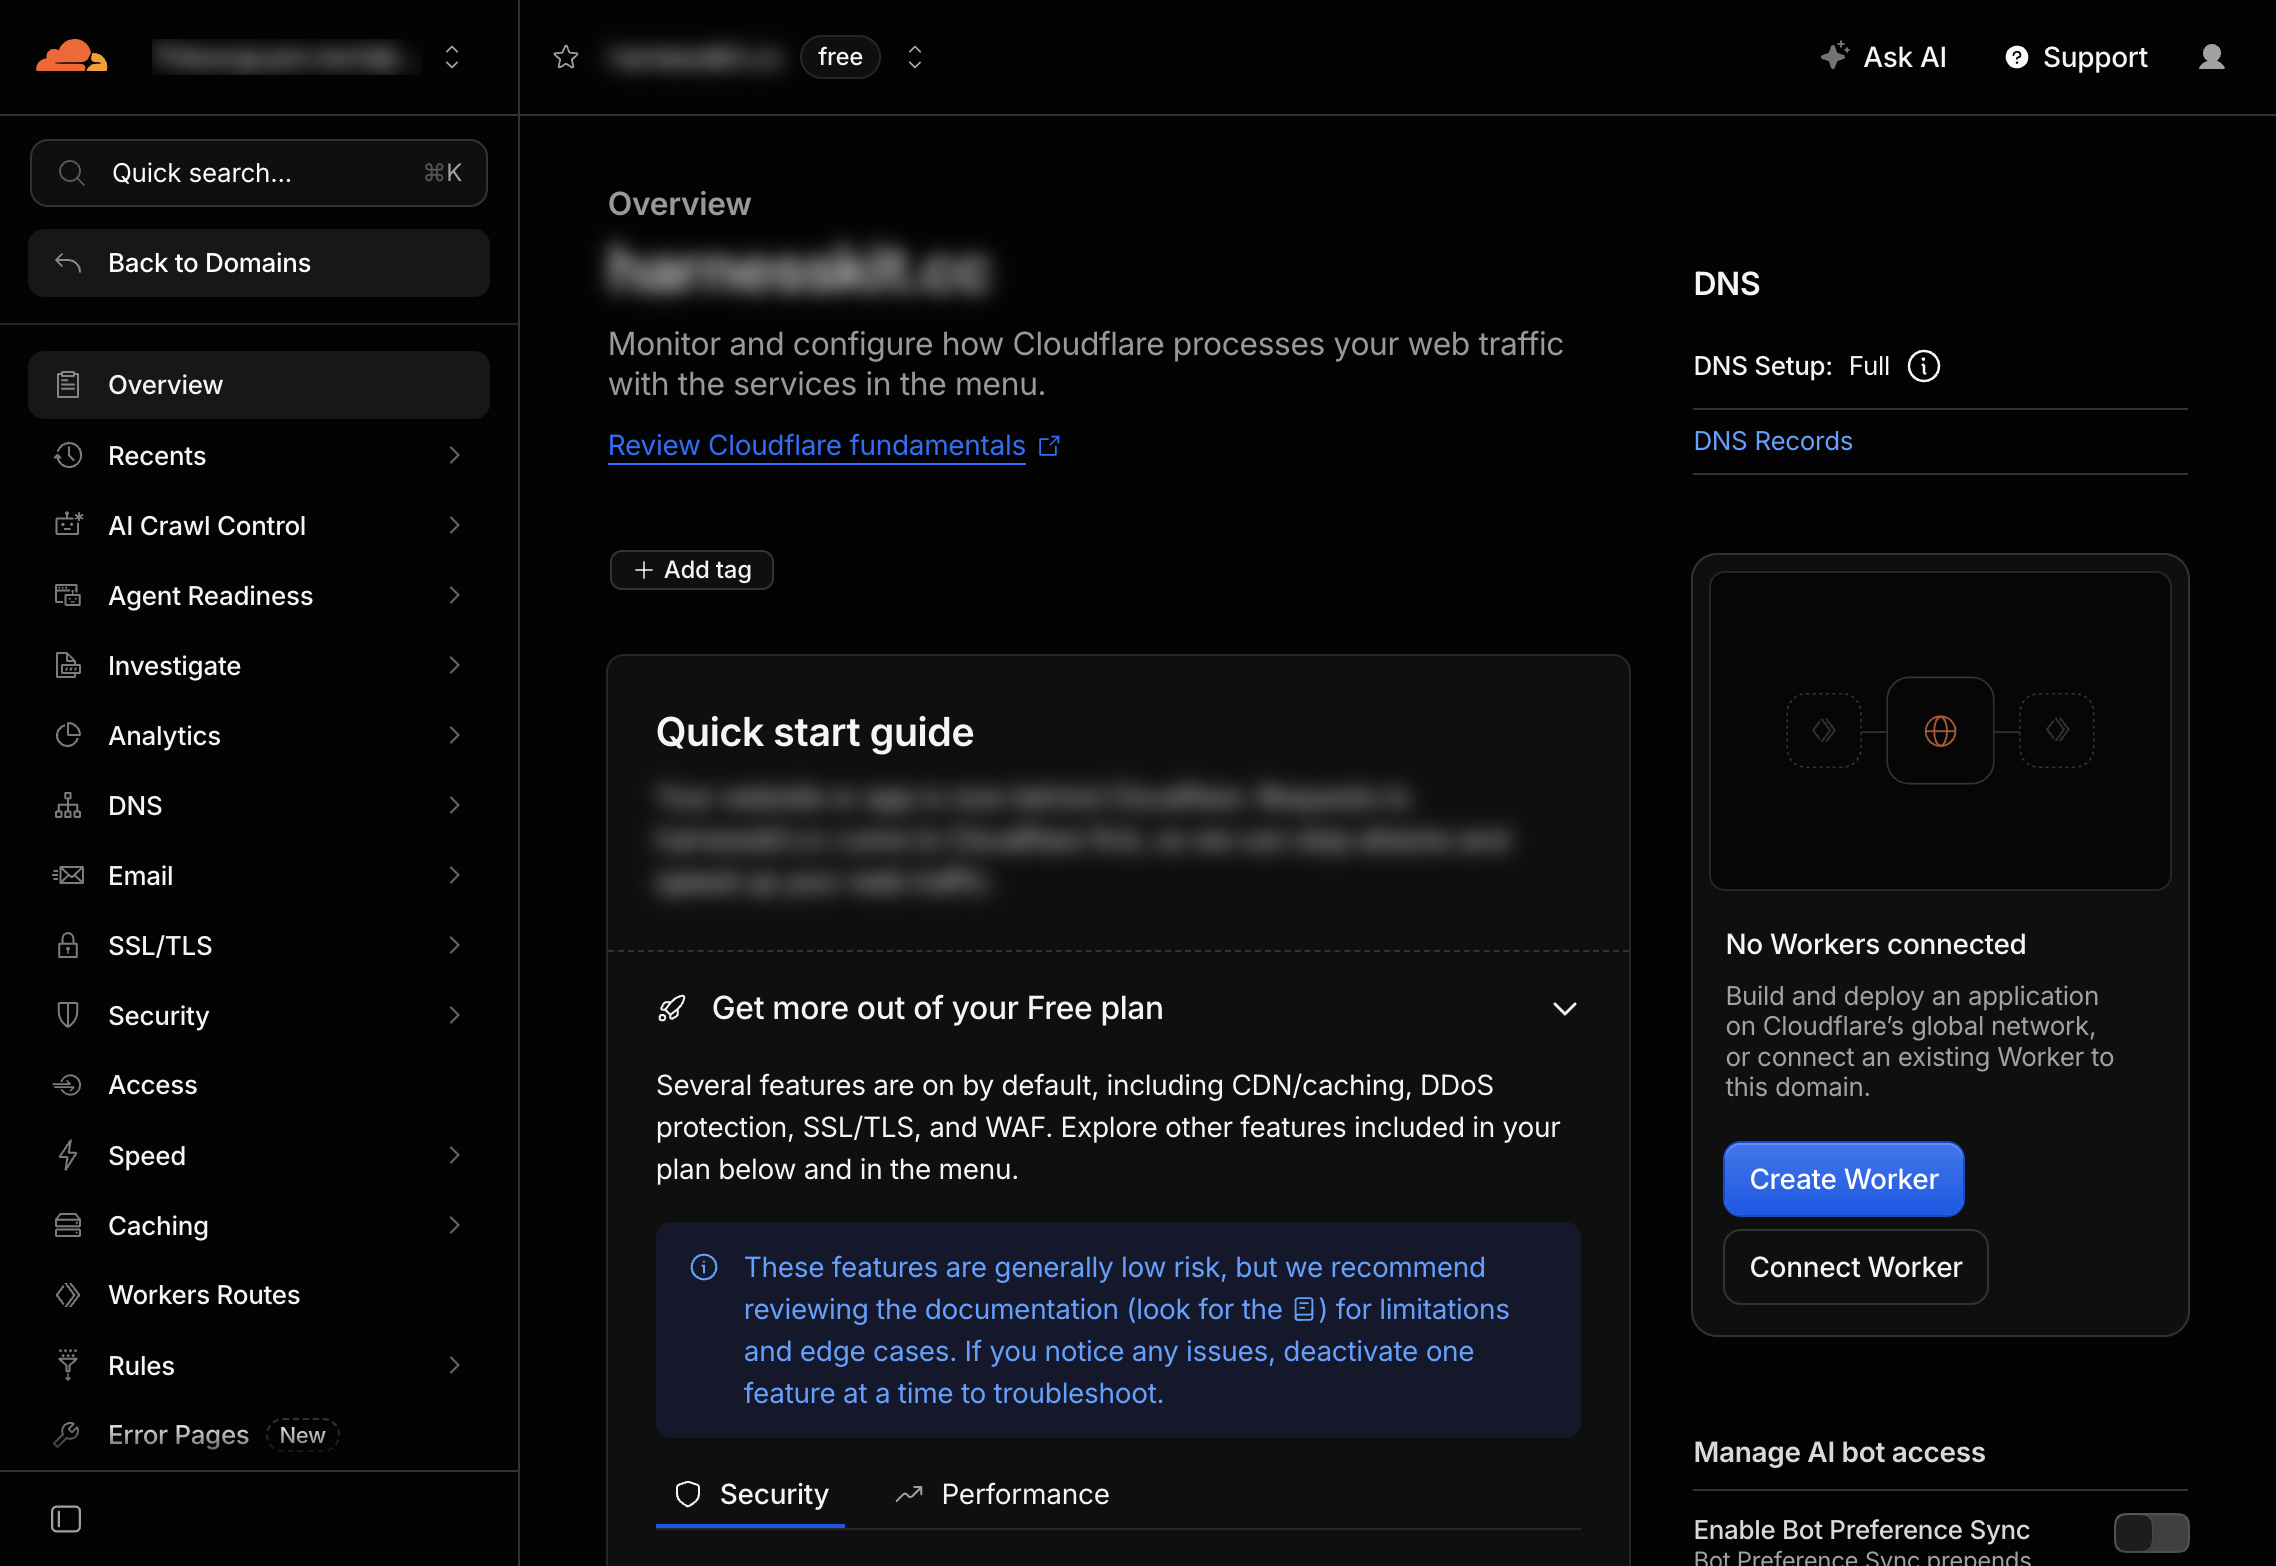
If ChatGPT is the target, you need a hostname in a zone you manage; it does not have to be a pretty domain. A cheap domain added to Cloudflare's free plan is enough. You can also keep the domain at another registrar and point its nameservers, or delegate a subdomain, to Cloudflare. The Zero Trust free plan covers a single user, so the main cost is the domain.
Unverified: whether
*.workers.dev,*.pages.devor*.cfargotunnel.comcan serve as an Access self-hosted application. The current understanding is no, because those are not zones you control, but this has not been tested, so do not treat it as settled.
2. Prerequisites
Eight prerequisites before you start. The first three are infrastructure, the next four are accounts and permissions, the last is usage.
| # | Prerequisite | Why |
|---|---|---|
| 1 | Linux VPS (the repo recommends Ubuntu 24.04 LTS or Debian 12; at least 4 GB of RAM, 8 GB recommended; a 40 GB or larger SSD) + Docker Engine 26 or newer with Compose v2, nginx, Certbot (nginx plugin), Git, curl, OpenSSL, systemd; ports 80/443 open to nginx | This is where the repo is cloned and the executor runs. Each workspace can use up to 1 GiB of RAM and one CPU. Cloudflare and ChatGPT cannot run Docker for you |
| 2 | A hostname you control, inside a Cloudflare zone, pointing at the VPS | docs/deployment.md requires a "hostname in an owner-controlled Cloudflare-managed zone". An sslip.io hostname does not qualify. Only required for the ChatGPT lane |
| 3 | A Cloudflare Zero Trust organization matching that zone | To create the Access application, the Allow policy and the Identity Provider |
| 4 | AUTH_MODE=cloudflare-access + issuer/audience/JWKS on the origin | The origin only trusts JWTs issued by Access |
| 5 | A ChatGPT plan with full MCP support | Check OpenAI's help page for your plan. Some plans can enable Developer mode and draft connectors but still hit FORBIDDEN: This conversation does not support developer MCPs at run time |
| 6 | Managed OAuth + Allowed redirect URIs on the Access app | ChatGPT has nowhere to attach an Authorization: Bearer header |
| 7 | An Access service token for the deploy canary | In Access mode the deploy command checks the new release through the public HTTPS edge with a service token. Without one the canary fails and the deploy rolls itself back |
| 8 | A 1-on-1 chat on the web | It does not run in a Custom GPT, Project chat (unless enabled), Canvas, temporary chat or mobile |
Only needed for specific cases: a GitHub App (only when cloning private repos) and an API-key gateway at api.<ROOT_DOMAIN> (a separate lane for IDE/CLI). The API key lane does not require Cloudflare Access, and per the table in section 1, owner-bearer mode still works with an sslip.io hostname.
One side alone is not enough. Cloudflare without a VPS leaves nowhere to run workspaces and Docker. A VPS without Cloudflare Access means ChatGPT Web cannot follow the documented OAuth flow.
Enable Developer mode in ChatGPT
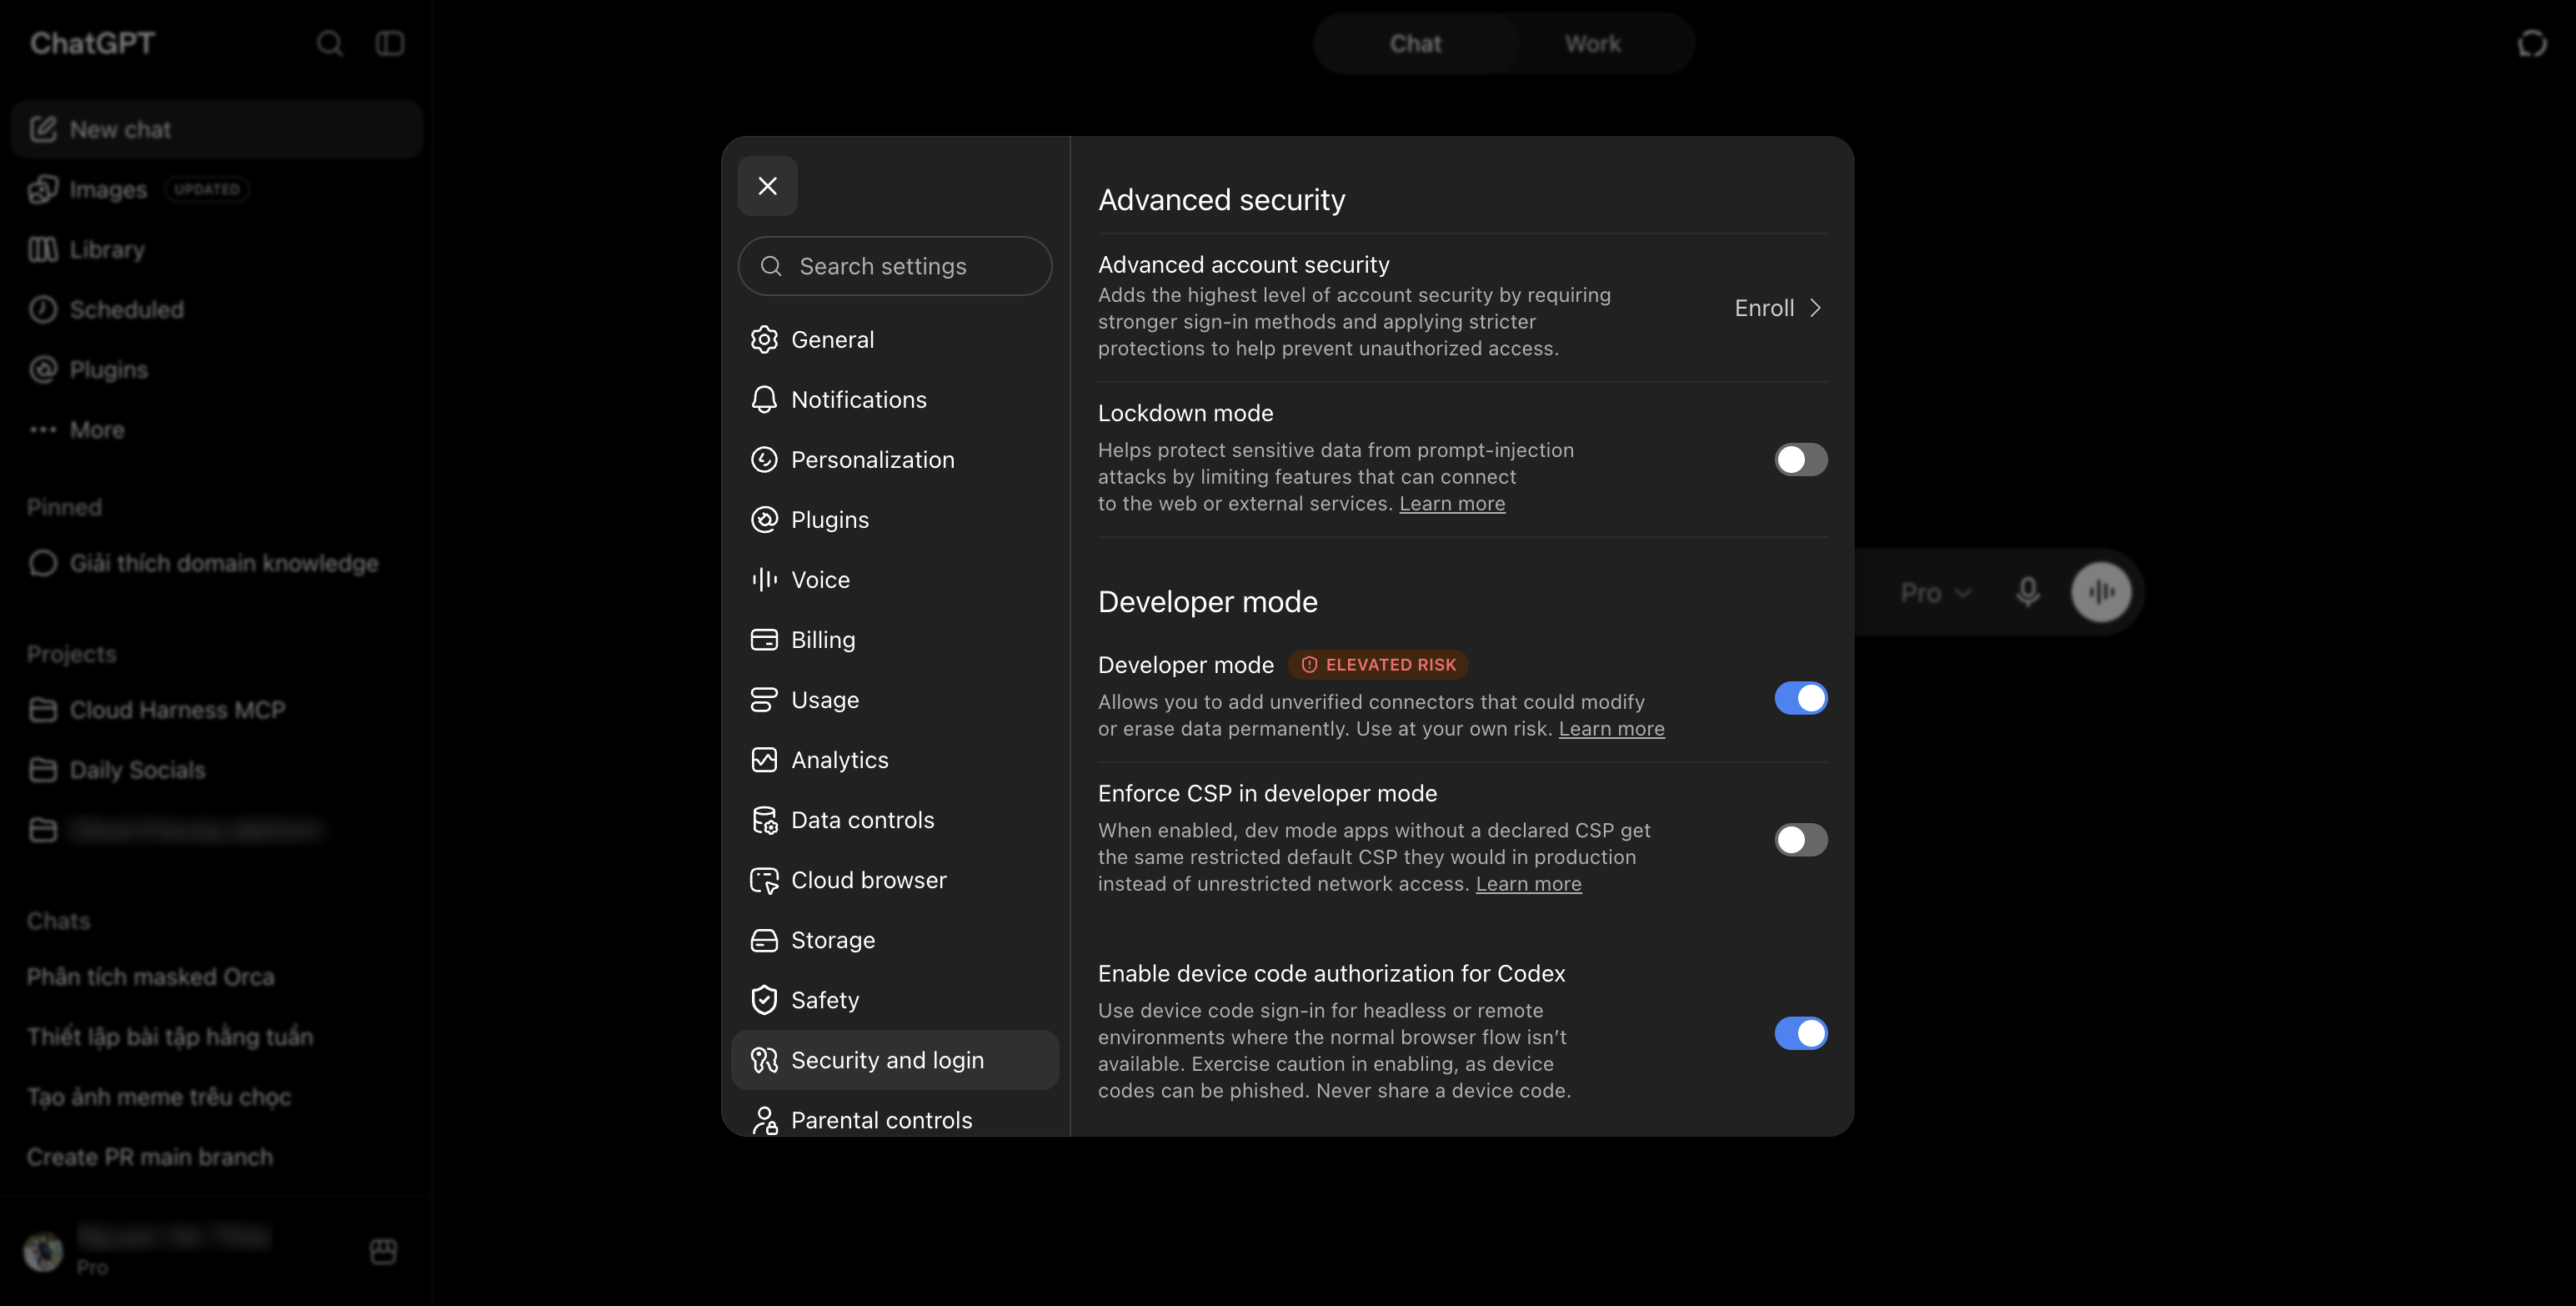
Path: https://chatgpt.com/ → avatar → Settings → Security and login → Developer mode (#settings/Security?section=developer-mode). Turn on the toggle and read the ELEVATED RISK warning. If your menu differs, the Cloud Harness docs give the path Settings → Apps → Advanced settings → Developer mode.
What about the one-command installer
The repo now ships scripts/install.sh, a one-command install with Caddy or Cloudflare Tunnel. That installer writes AUTH_MODE=owner-bearer, which is the API-key route for IDEs and the command line. The Cloudflare Access rollout in docs/deployment.md is written for the nginx route, so this series follows nginx.
Placeholders and sample values
From here on, the guide uses placeholders instead of real values. In the screenshots, these are the blurred regions.
| Placeholder | Meaning | Sample value, or what the blur hides |
|---|---|---|
<MCP_HOST> | Public hostname of the MCP | e.g. mcp.example.com |
<ROOT_DOMAIN> | Cloudflare zone | e.g. example.com |
<MCP_SUBDOMAIN> | A record subdomain | mcp (not blurred) |
<VPS_PUBLIC_IP> | VPS IPv4 | e.g. 203.0.113.10 (the A record content) |
<CF_TEAM> | Zero Trust team name | team name + team domain |
<ACCESS_AUD> | Application Audience (AUD) Tag | the hex string in the AUD tag tab |
<GITHUB_APP_SLUG> | GitHub App slug | app name on GitHub + breadcrumb |
<GITHUB_APP_ID> | Numeric App ID | the App ID: line |
<GITHUB_INSTALLATION_ID> | Numeric Installation ID | the INSTALLATION ID: line on the dashboard |
<OWNER>/<REPO> | Credential-free HTTPS repo | the repo name in the list |
<OPERATOR_EMAIL> | Email in the Allow policy | the email chip in the policy |
Configuration and secrets live in /etc/cloud-harness-mcp on the VPS (owned by root, mode 700). The runner sees that directory read-only at /run/cloud-harness-secrets. Commands you run on the VPS use the first path; environment variables that point at a secret file, such as GITHUB_APP_PRIVATE_KEY_FILE, use the second.
Endpoints after substitution:
| Purpose | Endpoint |
|---|---|
| MCP (ChatGPT OAuth) | https://<MCP_HOST>/mcp |
| Dashboard | https://<MCP_HOST>/dashboard |
| Bind GitHub | https://<MCP_HOST>/dashboard/github |
MCP gateway (same Access application as /mcp) | https://<MCP_HOST>/mcp-gateway |
| Local health | http://127.0.0.1:3100/readyz |
| API key lane | https://api.<ROOT_DOMAIN>/mcp |
A. End-to-end order
- Prepare the VPS + CF domain + Zero Trust + ChatGPT plan (section 2).
- DNS Proxied and pick the SSL/TLS mode (Part 2, section 3).
- Bootstrap the VPS, get TLS, deploy twice in
owner-bearermode, local/readyzreturns 200 (section 4). - Access app + hostname + policy + IdP (section 5).
- Managed OAuth + redirect URIs + AUD and team domain (section 6).
- Create the canary service token, cut over to
cloudflare-accesswith a separate deploy, and verify the 401 (section 7). - ChatGPT connector (section 8).
- GitHub App and dashboard bind, for private repos only (section 9).
To hand the VPS work to an AI agent, see Part 3.
D. References
Official docs: <https://docs.harness.agentkit.best/>
- Cloud Harness MCP: official docs:
docs.harness.agentkit.best - Architecture and how it works:
/how-it-works - Self-hosting & deployment:
/self-host - The 4-step workspace lifecycle:
/getting-started - Connecting ChatGPT:
/ai-tools/chatgpt - GitHub bindings:
/dashboard/github - API keys for the IDE/CLI lane:
/dashboard/api-keys - Environment variables:
/reference/environment-variables - Security model:
/security-model - Troubleshooting:
/troubleshooting - The repo on GitHub by Duy Nguyen (@mrgoonie):
bestagentkits/cloud-harness-mcp - VPS deployment runbook:
docs/deployment.md - GitHub App for private repositories:
docs/github-app-private-repositories.md
Use this piece in your agent
Get an API keyCopy the text below and paste it into Claude Code, Codex or whichever agent you use. The agent reads the piece and checks it against the repo you have open.
Read "Self-hosting Cloud Harness MCP for ChatGPT (1/3): Overview and prerequisites" on modernEngineer and apply it to this repo.
1. Call the content_get tool of the modernengineer MCP server with locale "en", slug "cloud-harness-mcp-chatgpt-setup". If MCP is not connected or access is refused, read the page https://modernengineer.dev/en/library/cloud-harness-mcp-chatgpt-setup instead.
2. Summarize the main steps of the piece and point out which apply to this repo.
3. Propose concrete changes and ask me before editing any file.
Connect MCP in Claude Code (once)
claude mcp add --transport http modernengineer \
  https://api.modernengineer.dev/mcp \
--header "Authorization: Bearer <API key>"This piece is open to everyone: without MCP, the agent can still read it straight from the link.
- Version
- v1.0.0
- Updated
- 16/09/2026
- Licence
- All rights reserved
- Slug
- cloud-harness-mcp-chatgpt-setup