Quick summary: Your first day with Pi, the open-source terminal coding agent from Earendil Works, takes five steps: install Pi, start it in your repo and decide on project trust, run
/loginand pick a model, hand it a small task, and the next day resume withpi --continue. Pi does not ask before each tool call, so work in a repo with a clean git tree, or run all of Pi in a container when the repo is not yours.
Part 1 helps you decide whether to use Pi. This post is for when you have decided to try it: open a terminal and keep going until Pi finishes real work in your repo.
Written for Pi 1.3.0, based on the official quickstart, docs, source code and CHANGELOG. The install commands in this post install the latest release rather than pinning 1.3.0, so if yours is newer, check the CHANGELOG.
A few setup choices matter more than they look. Pi runs every tool call with the full permissions of the account that started it, so where you run Pi and which project files you trust decide how far a bad instruction can reach. So I go through it step by step, each with a check you can run before moving on.
What do you need before installing Pi?
To follow this post, you need three things: a terminal, a way to reach a model, and a git repo. Pi runs in any folder, but git lets you see and undo its changes.
- A terminal: macOS, Linux or Windows. Pi needs Node.js 22.19 or newer; the official installers for macOS, Linux and Windows can install Node.js for you if it is missing (README). On Windows, also install Git for Windows so Pi has Git Bash for the
bashtool and!commands, or run Pi in WSL (Windows). - Model access: an existing subscription (Claude Pro or Max, ChatGPT, GitHub Copilot, per the pi-ai README), a provider API (Application Programming Interface) key, or a local model through llama.cpp (Models).
- A git repo with a clean working tree: Pi's quickstart recommends version control or backups for important work. Run
git statusfirst, so after the taskgit diffshows exactly what Pi changed.
What are the five steps from install to your first task?
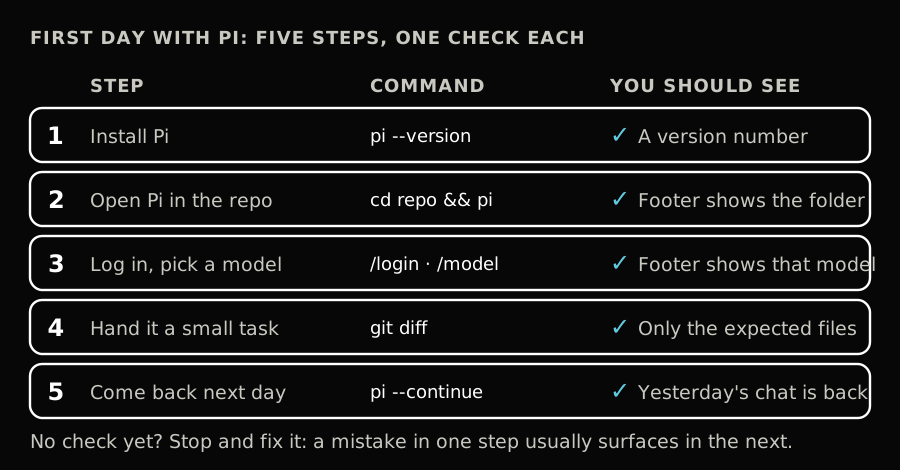
The steps follow the order you meet them on day one: install, start Pi in your repo, sign in, hand it work, then come back the next day. Each step ends with a check; don't skip it, because a mistake in one step often only shows up in the next.
Step 1: How do you install Pi?
The quickest route is the official installer. It pins every dependency, and later you update with pi update.
curl -fsSL https://pi.dev/install.sh | shOn Windows, run this in PowerShell, per the README:
powershell -c "irm https://pi.dev/install.ps1 | iex"Two other routes, per the quickstart:
- Through npm:
npm install -g --ignore-scripts @earendil-works/pi-coding-agent. This needs Node.js 22.19 or newer and, unlike the installer, does not pin transitive dependencies. - Through Nix on macOS or Linux:
nix profile add github:earendil-works/pi/stable. Nix builds Pi from source. Older Nix versions usenix profile installinstead ofnix profile add. To pin a release, replacestablewith a tag such asv1.3.0.
Check:
pi --versionprints a version number.
Common errors at this step:
- Installing through npm with Node.js older than 22.19: upgrade Node.js or use the installer. - Running
pi updateon a Nix install: it cannot update a Nix installation. Usenix profile upgrade pi.
Step 2: How do you start Pi in your repo and choose project trust?
If the repo is not yours, read the section on running Pi in a container before this step. For your own repo, change into it and run pi. Pi uses this folder to find files, read instructions, load configuration and group saved sessions.
cd ~/code/my-repo
pi
If the folder has its own Pi configuration or resources, such as .pi/settings.json, .pi/mcp.json, .pi/extensions or .pi/skills, or project skills in .agents/skills in the current folder or a parent folder, with default settings Pi asks whether you trust the folder before loading them, unless a decision is already saved for that folder or a parent. This is project trust (Security). An empty .pi folder does not trigger the question.
| Repo | Choice | What Pi does |
|---|---|---|
Your own or your team's, where you know who wrote the files in .pi and .agents/skills | Trust | Loads the project's extensions, skills, MCP (Model Context Protocol) servers and settings. |
| Just cloned from a stranger | Don't trust | Still runs, but skips the project's extensions, skills, MCP servers and settings. |
The one exception is sessionDir in the repo's .pi/settings.json, the setting that picks where session files are stored. Pi needs to know where to store the session at startup, before it asks you about trust, so it uses this setting even if you decline. A stranger's repo can therefore still decide where Pi writes session files.
If none of these exist, Pi doesn't ask. When it does ask, you can save the decision for the folder, or apply it to this session only (the options marked "this session only") (trust-manager.ts). Saved decisions live in ~/.pi/agent/trust.json; to change one, type /trust, and the new decision applies to later Pi runs.
Project trust does not do two things people often assume. First, it does not block tool calls: once Pi runs, its tools have the full permissions of the user who started it. Second, instruction files such as AGENTS.md or CLAUDE.md still load when you decline trust, so their content can still steer the model.
Check: the interface shows the conversation area, an editor at the bottom, and a footer with the current folder, model and context usage. The startup header lists the instruction files and resources Pi loaded.
Common errors at this step: running natively on Windows, Pi cannot find Bash, so the
bashtool and!commands fail. Install Git for Windows and restart Pi.
Step 3: How do you sign in and choose a model?
Inside Pi, type:
/loginChoose a provider and follow the prompts: sign in with a subscription through the browser, or paste an API key. Pi stores this in ~/.pi/agent/auth.json, so never commit or share that file.
Then type /model to choose a model. In the picker, press Ctrl+S to save it as the default for new sessions. /thinking selects the reasoning level, limited to levels the current model supports.
Check: the footer shows the model you just picked.
Common errors at this step:
- Empty or incomplete model list:
/modelonly lists models from providers with usable credentials, whether those come from/login, an environment variable ormodels.json(Models). Check how you authenticate that provider, or run/loginagain. Some providers also filter models by what the key may use; with the default OpenRouter endpoint, for example, Pi lists only the chat models that key may use (Providers), and signing in again does not change that. - Signing in on a machine without a browser, for example over SSH: the OAuth callback may not reach Pi. When prompted, paste the final redirect URL or the authorization code (Providers). - Using an Anthropic subscription: Pi'swarnings.anthropicExtraUsagewarning, on by default, tells you when usage may count toward paid extra usage (Settings). Leave it on until you know how your plan bills.
Step 4: How do you hand Pi a first task safely?
Make the first task read-only, so you learn how Pi works before anything changes. Pi's quickstart suggests something like:
Explain how this repository is structured and how to run its checks.Pi shows every file read, search, command and edit as it works. Press Ctrl+O to expand or collapse tool output.
Once the answer makes sense, ask for a small change you can verify, such as fixing a typo in the README or adding a test for a simple function. A few actions you will use often while Pi works (Usage):
| You want to | Action |
|---|---|
| Add a file to the prompt | Type @ and search for it |
| Run a command and send its output to the model | !git status |
| Run a command without sending its output | !!git status |
| Steer the running task | Type a message, then Enter |
| Queue work after the current task | Type a message, then Alt+Enter (Windows and WSL: Ctrl+Q) |
| Stop the task | Escape |
A message sent with Enter while Pi works waits for the current response and its tool calls to finish, then steers the next response. A queued message waits until the whole task is done.
Check:
git status --shortlists only the files you expected, andgit diffshows the change you asked for. If Pi added a test, run it once yourself, since reading the diff does not prove the test runs. Open every new file (marked??), sincegit diffdoes not show untracked files. If something is off,git restore <file>drops changes to tracked files; delete unwanted new files yourself, then restate the request more precisely.
Common errors at this step: Windows Terminal reserves
Alt+Enterfor fullscreen, so on Windows and WSL Pi usesCtrl+Qto queue. On macOS, WezTerm and Alacritty need configuration to pass this key combination to Pi. Terminal Setup shows how to configure each one.
Step 5: Which command resumes the session the next day?
Use pi --continue from the same repo folder. Pi saves sessions automatically; you don't need to do anything when you exit.
cd ~/code/my-repo
pi --continue
Three commands keep you from getting lost between sessions (Sessions):
- Name:
/namenames the current session so you can find it later. - Switch:
/resumeopens the session picker. - Inspect:
/sessionshows the session file, message count, token usage and cost.
Check: after
pi --continue, yesterday's conversation is back, and Pi restores the session's model and thinking level. If that model is no longer usable, for example because its credentials are gone, Pi reports that it could not restore it and picks a replacement if any model is usable, or reports that no model is available; the thinking level is also limited to what the actual model supports (sdk.ts).
Common errors at this step:
pi --continueopens the most recent session of the folder you are in. Run it from another folder and you get that folder's session, not the one you want. If the folder has no session yet, Pi starts a new one. Alwayscdinto the right repo first.
When should you run Pi in a container?
When the repo is not yours, when Pi runs unattended, or when the machine holds important credentials. Pi has no built-in permission system, and the Security docs say plainly that project trust and reviewing changes are not safety boundaries. The real boundary is limiting the files, credentials and network Pi can reach. For your own repo, with a clean git tree and you following along on screen while Pi works, ready to press Escape if it runs something odd, running Pi directly is acceptable.
The simplest option is Docker (Containerization). Create Dockerfile.pi:
FROM node:24-bookworm-slim

RUN apt-get update \
  && apt-get install -y --no-install-recommends bash ca-certificates git ripgrep \
  && rm -rf /var/lib/apt/lists/*
RUN npm install -g --ignore-scripts @earendil-works/pi-coding-agent

WORKDIR /workspace
ENTRYPOINT ["pi"]
Build it, then run it from your repo folder (bash syntax):
docker build -t pi-sandbox -f Dockerfile.pi .
docker run --rm -it \
  -e ANTHROPIC_API_KEY \
  -v "$PWD:/workspace" \
  -v pi-agent-my-repo:/root/.pi/agent \
pi-sandbox- Credentials: replace
ANTHROPIC_API_KEYwith your provider's variable, and make sure it has a value in your shell. With a subscription, drop the-eline and run/logininside the container. Don't mount your host's~/.pi/agentinto the container. - Resuming: add
--continueafterpi-sandbox. Use a separate volume name per repo: every repo sits at/workspace, so a shared volume can open the wrong session. - The container is not full isolation: the mounted repo is writable, Pi can edit
.git(for example, add a hook that runs on your next commit), and the container can still reach the network, so it can send your API key out. Mount:rofor read-only work, and give the container only the credentials the task needs.
Check: inside Pi,
!pwdprints/workspace.
What should you read next when sessions get long?
After day one you have Pi running in your repo, a default model, a finished task and a way back into the session. The most important takeaway: Pi's limits come from the environment you build, not from prompts or instructions, so a clean git tree and a container are habits worth keeping from the start.
As you work longer in one session, the agent will eventually forget a settled decision or the context will fill up. Part 3 of the series (coming soon) will explain sessions, branches and compaction in Pi, with a table of symptoms and fixes. From part 3 on, Inside Pi posts are for Subscribers.
Use this piece in your agent
Get an API keyCopy the text below and paste it into Claude Code, Codex or whichever agent you use. The agent reads the piece and checks it against the repo you have open.
Read "Your first day with Pi: from install to a real task in your repo" on modernEngineer and apply it to this repo.
1. Call the content_get tool of the modernengineer MCP server with locale "en", slug "pi-first-day-setup-to-real-task". If MCP is not connected or access is refused, read the page https://modernengineer.dev/en/library/pi-first-day-setup-to-real-task instead.
2. Summarize the main steps of the piece and point out which apply to this repo.
3. Propose concrete changes and ask me before editing any file.
Connect MCP in Claude Code (once)
claude mcp add --transport http modernengineer \
  https://api.modernengineer.dev/mcp \
--header "Authorization: Bearer <API key>"This piece is open to everyone: without MCP, the agent can still read it straight from the link.
- Version
- v1.0.0
- Updated
- 07/10/2026
- Licence
- All rights reserved
- Slug
- pi-first-day-setup-to-real-task